In this post I am going to explain how to create a sample API using the Go programming language and the Gin web framework, and deploy it to AWS Lambda together with API Gateway. While not a silver bullet, serverless platforms such as AWS Lambda or Azure Functions are extremely useful for a lot of use cases. Cost is negligible for low usage applications (for high usage, it may be more cost effective looking into other solutions). Ease of deployment, as well as operational complexity, are really really low, as you are delegating the heavy lifting onto AWS.
Unlike other tutorials and posts out there, in here we are deploying a full API, meaning that the routing to different endpoints will happen inside our application. While there is some advantages to having one application/lambda for each endpoint, in my experience it becomes very troublesome very fast, as usually multiple endpoints will be closely related (in a microservice, for example) and having separate deployment pipelines for each does not really make any sense.
Using Go for our application allows us to have an even easier deployment than with other platforms, as well as very quickly cold starts (the time it takes for the function to start the first time). This, together with the fact that Go is well suited for developing backend applications, makes it an ideal candidate for a serverless API.
Prerequisites
This article assumes that you have:
- A working environment for coding in Go.
- An AWS account where you can create resources.
This tutorial can be followed even with little knowledge of AWS or Go.
Part 1: Creating the application
Create a new application
To get started, create a new Go application. For a non-trivial application, you want to properly structure your application, for example by following this common and recommended structure. As this tutorial is going to be extremely small with just a single code file, we can just get by without it.
Create a new folder for the application called golang-api or however you want to name your application, and initialize the main module (replace the name with your own):
$ mkdir golang-api
$ cd golang-api

$ go mod init github.com/carsanlop/golang-api
The application will need an entrypoint. For that, create a main.go file in the root folder.
$ touch main.go
Add the web framework
There are several web frameworks for Go. Some examples are gorilla/mux, Chi, Echo or Negroni. However, for this tutorial, we are going to use the most popular one, Gin.
Start by adding Gin as a dependency to the project:
$ go get -u github.com/gin-gonic/gin
To ensure that everything so far is okay, create the core for the application. It will have two very basic GET endpoints (so routing can be tested). In the previously created main.go file, write the following code:
package main

import (
	"github.com/gin-gonic/gin"
)

func main() {
	r := gin.Default()
	r.GET("/first", func(c *gin.Context) {
		c.JSON(200, "hello world from the first endpoint!")
	})

	r.GET("/second", func(c *gin.Context) {
		c.JSON(200, "hello world from the second endpoint!")
	})
	r.Run()
}
This code creates a default instance of the Gin Engine with gin.Default() (named r commonly, as routing is its main task), creates two GET endpoint with r.GET(...) which simply return an OK response and a simple message, and then starts the server loop with r.Run(). This last instructions will listen and wait for connections and handle them as needed, invoking the endpoint code when the request path matches one of them. As this is the entrypoint for the application, this is all placed in the main() function inside the main package.
Execute the program with the go run command:
go run main.go
Use your browser to access localhost:8080/first or localhost:8080/second, and you should see the corresponding hello world message. Great! With just this little bit of code, now you have a basic API working in Go!
Considerations when using AWS Lambda
Right now, the application can be used in your computer, and it would also work if you hosted it using a normal server or Docker. However, if you deployed it to AWS Lambda, it would not work properly. The reason is that when Lambda is triggered by other service (such as API Gateway or an Application Load Balancer), the actual request reaching the server will be transformed by that service and will not be a common HTTP request, as Gin expects. The same would apply to the response, which needs to be understood by the service. The lambda function behind an API Gateway will be invoked with something like this:
{
    "version": "2.0",
    "headers": {
        "x-forwarded-for": "205.255.255.176"
    },
    "requestContext": {
        "http": {
            "method": "GET",
            "path": "/default/nodejs-apig-function-1G3XMPLZXVXYI",
            "protocol": "HTTP/1.1"
        },
        "time": "10/Mar/2020:05:16:23 +0000",
    }
}
(a lot of fields omitted for brevity, you can refer to event-v2.json for a real example).
The application will need some code that converts that special format into the format that the web framework is expecting, and also does the same for the response.
Adding the lambda proxy
AWS provides a module to help precisely with this conversion in the form of the AWS Lambda Go API Proxy module. This will take care of the conversion for you, hiding all the complexity so that the application works very similar to what you currently have.
Install the required dependencies for this module:
$ go get -u github.com/aws/aws-lambda-go/events
$ go get -u github.com/aws/aws-lambda-go/lambda
$ go get -u github.com/awslabs/aws-lambda-go-api-proxy
Now, modify the previous code so that it implements the code from aws-lambda-go-api-proxy:
package main

import (
	"context"

	"github.com/aws/aws-lambda-go/events"
	"github.com/aws/aws-lambda-go/lambda"
	ginadapter "github.com/awslabs/aws-lambda-go-api-proxy/gin"
	"github.com/gin-gonic/gin"
)

var ginLambda *ginadapter.GinLambdaV2

func init() {
	r := gin.Default()

	r.GET("/first", func(c *gin.Context) {
		c.JSON(200, "hello world from the first endpoint!")
	})

	r.GET("/second", func(c *gin.Context) {
		c.JSON(200, "hello world from the second endpoint!")
	})

	ginLambda = ginadapter.NewV2(r)
}

func Handler(ctx context.Context, req events.APIGatewayV2HTTPRequest) (events.APIGatewayV2HTTPResponse, error) {
	return ginLambda.ProxyWithContext(ctx, req)
}

func main() {
	lambda.Start(Handler)
}
The initialization code for Gin has been moved from main() to init(). In Go, this is a special function that will be called once per package, and is frequently used for setting up elements needed by the rest of the applicatiom.
In the main() function, a special Start function is now called, receiving a Handler function as a parameter. That function will then proxy all the requests over to the gin adapter, which is where the conversion will take place. After that, Gin will take over as in the previous example. Notice that now, Run() is no longer being invoked - the Lambda proxy code will take care of it.
Support for local development
At this point, you could directly skip to the deployment section and your code would be able to run in Lambda. However, if you now want to launch it locally or in another hosting environment, the application will not work and throw an error about not being run into Lambda, failing immediately. If you had to deploy to Lambda on every code change, that would greatly harm the development experience and speed.
To solve this, there are two main options. You could use AWS SAM, which would simulate the behavior of both API Gateway and Lambda in your local machine, as well as helping you to manage and deploy the application.
However, for this tutorial, you will instead add some code to determine whether we are running inside Lambda or not, and initialize the adapter based on that. That way, when running in Lambda, we will use the previous example, but when running outside of Lambda, we will initialize Gin normally by invoking its Run() function. It would enable you to more easily move to another hosting (e.g. Fargate or EC2) if needed.
A common method to do that verifying is to check for the presence of specific environment variables which are always set in AWS Lambda. One such variable is LAMBDA_TASK_ROOT, which will always contain the path to the Lambda function code. Modify your code as per the following example:
package main

import (
	"context"
	"os"

	"github.com/aws/aws-lambda-go/events"
	"github.com/aws/aws-lambda-go/lambda"
	ginadapter "github.com/awslabs/aws-lambda-go-api-proxy/gin"
	"github.com/gin-gonic/gin"
)

var ginLambda *ginadapter.GinLambdaV2
var ginEngine *gin.Engine

func init() {
	r := gin.Default()

	r.GET("/first", func(c *gin.Context) {
		c.JSON(200, "hello world from the first endpoint!")
	})

	r.GET("/second", func(c *gin.Context) {
		c.JSON(200, "hello world from the second endpoint!")
	})

	ginEngine = r
}

func main() {
	lambdaTaskRoot := os.Getenv("LAMBDA_TASK_ROOT")
	if lambdaTaskRoot != "" {
		// If LAMBDA_TASK_ROOT is set, we are running inside Lambda.
		ginLambda = ginadapter.NewV2(ginEngine)

		lambda.Start(func(ctx context.Context, req events.APIGatewayV2HTTPRequest) (events.APIGatewayV2HTTPResponse, error) {
			return ginLambda.ProxyWithContext(ctx, req)
		})
	} else {
		// Else, we are running in a local or other environment.
		ginEngine.Run()
	}
}
This code stores a reference to the gin.Engine on the package scope, which gets populated in the init() function. Then, in the main() function, depending on whether running on Lambda or not, the engine gets executed through an adapter or directly instead. If you run the application, it will work normally and you will be able to again access using your browser.
Part 2: Deploying to AWS
With the application created, the next step is deploying on AWS. The architecture is extremely simple:

A request will reach the API Gateway, and it will be proxied, regardless of method or path, to the function you just created.
For this tutorial, the AWS Console will be used to directly created the resources. For a real, production application, it is strongly recommended to look into tools to automate this process, like the aforementioned AWS SAM, or other technologies such as Terraform or the AWS CDK.
As the resources that will be created are serverless (you pay per usage) and are covered by the free tier, the expected cost is zero or, at most, a couple of cents. It is recommended to delete them shortly after the tutorial if you do not intend to use them anymore, to avoid them accruing costs in the future.
Creating and configuring the lambda function
Go into the AWS Management Console and login with your credentials. From the list of available services, navigate over to Lambda and ensure that the proper region where you want to create the resources is selected.
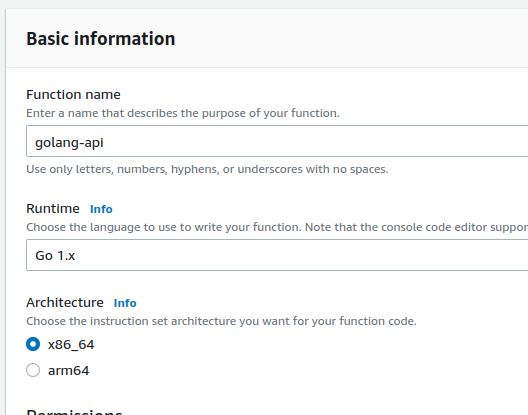
Click on Create function on the Lambda homepage to create a new function. Give it the name you want (for example, golang-api), and select the Go 1.x runtime and x86_64. Then click on the Create function button at the bottom, and the new function will be quickly created:

A note on the architecture and runtimes. It is possible to build and run the application on the arm64 architecture (which uses the Amazon Graviton2 processor). The advantage to doing this is significant cost savings of up to 20-30%. However, as of now, this requires some extra complexity when creating the Lambda function, so it will not be covered in here. You can read more on this article on the topic or this announcement by AWS.
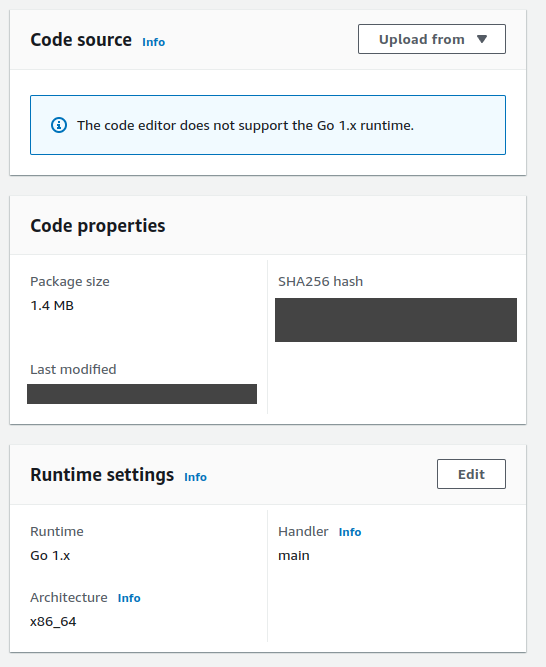
Right now, the function just contains a hello world provided by AWS. To upload your own code, the first step is to build the application. Run the following command:
$ GOOS=linux GOARCH=amd64 CGO_ENABLED=0 go build main.go
The variables at the start are important, as the Lambda environment uses Linux as an OS, and the architecture is x86_64 as previously selected, so the build needs to cater to it. CGO_ENABLED=0 will create a statically linked binary, not requiring external dependencies, to prevent issues when libc varying between environments.
After the build, a binary named main will have been created on the root folder. You need to zip it and upload to Lambda. Run the following command to generate a function.zip file containing our binary:
$ zip function.zip main
Now, back on the console, upload the zip file you just created. Also, modify the handler. By default it is set to hello, however, you need to set it to main so that it matches your entrypoint code (the main() function).

Creating and configuring an API Gateway
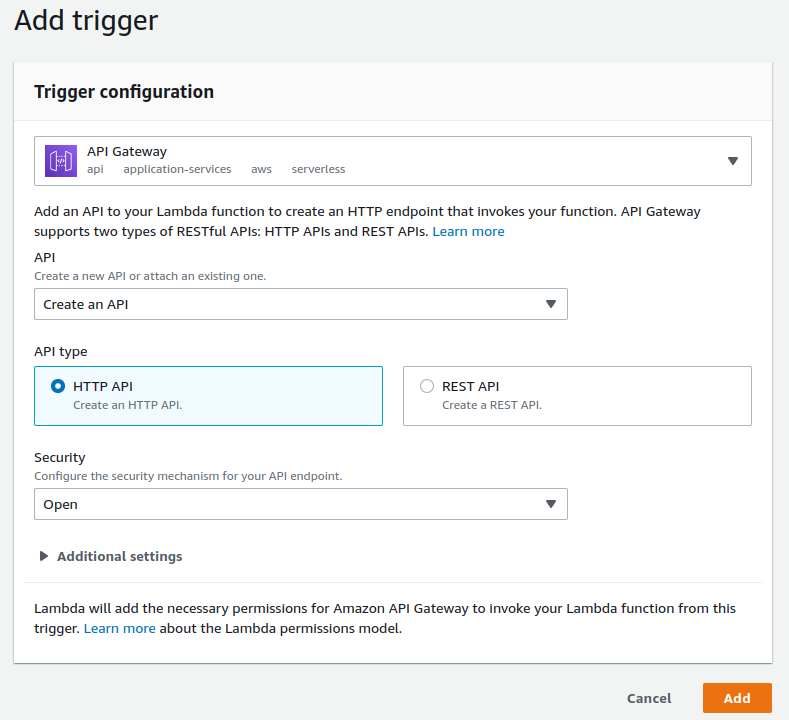
Your lambda is now created, but it cannot be invoked yet. For that, create a new API Gateway. To do so in the most simple and quick way, you can click on the Add trigger button, and then create a new API Gateway (using HTTP API instead of REST API):

This will create the API Gateway resource, the integration (which connects it to the Lambda) and some default routes and stages. You can find more information in the Configuration > Triggers area of the Lambda, or directly go to the service itself. Review the newly created resource and explore some of its concepts such as routes, stages or integrations. API Gateway has lots of options and what you created is simply a very basic starting point.
If you try to access the endpoint now, it will not work. That is because by default, the newly created API Gateway expects a single-endpoint Lambda, however, we want to let our application and Gin handle the routing. But that can be easily solved.
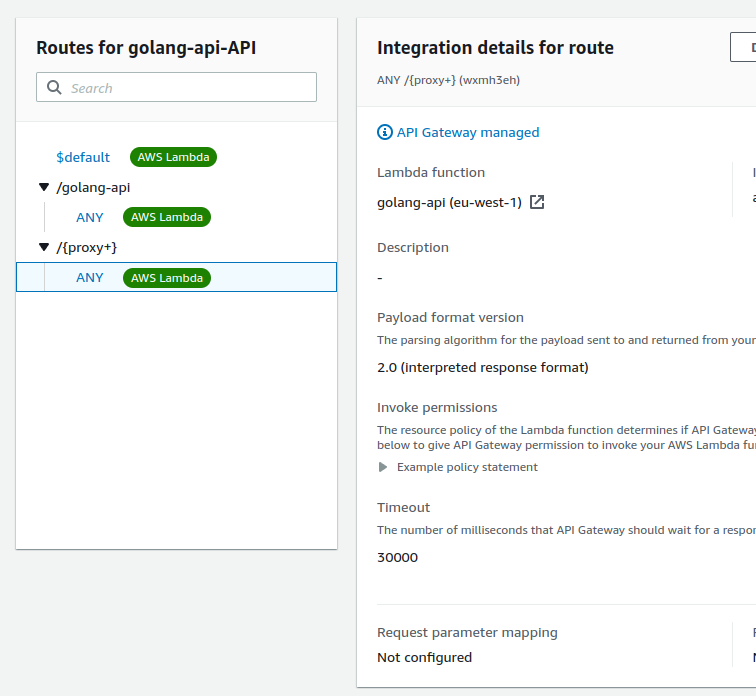
In the API Gateway, create a new route. Choose the ANY method (so that it applies to GET, POST and any other HTTP method) and, as the route, enter /{proxy+}. This is a special keyword that means to forward any request with any path. So this endpoint would match routes such as /first or /second, which are the ones supported by the application. Any other endpoint that you add in the future can be added directly to the application, without the need to modify the gateway.
Finally, once the route is created, attach an integration to the Lambda (you should already have one by default created by the assistant) so that it ends up looking like this:

If you now access the /first endpoint, it should now work and display the hello world message. You may want to read further on API Gateway, especially about how to secure it (right now, it is open to the public). But in any case, congratulations! You can now keep extending the application as much as you want, and you have a quick, easy and cheap way to host it.
HTTP API vs REST API
API Gateway is offered as two products: REST API and HTTP API. HTTP API is newer, cheaper and faster; however, REST API provides a wider set of features. You can see a more detailed comparison in the documentation and decide which version suits your needs. For the tutorial, we will use HTTP API.
The version that you use is important because the request and response format is different between them. For example, the code previosly shown is using methods such as NewV2(...) or types such as APIGatewayV2HTTPRequest. These are for HTTP API (also referred to as V2). For REST API, New(...) or APIGatewayProxyRequest would be used instead, and you might find those used in other tutorials or examples.
